
How My Photography Improve During My 30 Day Photography Challenge
- Janet G.

- Jan 6, 2020
- 11 min read
Updated: Sep 28, 2021
In June of 2019, I did my own personal 30 Day Photography Challenge. There are two main reasons why I did the challenge:
To improve my photography skills
To show-up on Instagram Stories.

I've been doing photography since 2015, and I haven't seen a great improvement in my photography. I was stuck in my comfort zone. I've been doing the same poses, same angles and same camera settings - basically little to no improvement.

And I was tired of looking at my photography basic and boring. So, like any other creative person, I turned to YouTube and searched for ideas on how to improve my photography skills. That's when I found a video from Peter McKinnon titled “For All Creators.” He mentions the 3-6-5 Photography Challenge. That's where I got inspired and decided to create my own 30-Day Photography Challenge.
Click here to learn how you can create your own customize photography challenge.
Before I start showing ALL of the pictures from this challenge, I want to share my non-negotiable condition I had for the challenge - to have at least one person on my photos.
I'm a portrait photographer in Phoenix - I take pictures of families and quinceañeras. In order to improve my photography skills to meet my needs, I had to make sure this challenge will help me.
A BIG shout out to my sister, Marlen, who helped me during this challenge. She loved it. She got to buy new clothes and try something new. Plus, free food. Almost every day we stopped by Dutch Bros, Starbucks or somewhere to get food when we were done with our photo sessions. She got very comfortable being on camera.
Camera Equipment I Used During My 30 Day Photography Challenge
During this challenge, I used my Canon 6D Mark II and my Canon EF 50mm 1.8 prime lens. One thing I learned from doing this challenge is that you can never go wrong with a prime lens! By using prime lenses, your pictures come out focused. Plus, the depth of field is amazing!
I already knew this, but never appreciated it the knowledge. I always use my zoom lens, Canon EF 24- 70mm 2.8, for my session. It gives me the convenience to zoom in and out, instead of physically moving for a better angle.
From now on, I'll be using my primes lens more often to get the better picture.
The Pictures From My 30 Day Photography Challenge
Below are all of the pictures from the challenge. Let me know in the comments below which challenge was your favorite.
Day 1: Self Portrait
This was the easiest. I took this one in my room looking at a mirror.

Day 2: Photography Hack 📸 Using my iPhone
This photography hack is using any phone and create a reflection on the picture. You can notice it at the bottom left corner.

Day 3: Home
For this challenge, I decided to be creative and photograph what home means to me. I'm going to copy the caption I used on IG when I share these photos.
"..Home for me means anywhere where my family is: my mom, my bro, and my two sisters. 1️⃣ The first photo is my mom. She's my inspiration. She’s the one who told me and pushed me into starting my own photography biz.
2️⃣ The second photo is my bro. It takes a while to get him into smiling.
3️⃣ The third photo is my little baby sister. She’s 16!!!! Don’t know when that happens, but she’s amazing. She helps me out during my photo sessions and photography events. She’s the one who films and photographs behind the scenes.
4️⃣ My other sister, Liz, she’s currently on an international internship building houses. Miss you, Liz.
So, I still live with my mom. Every time someone asks me when I’m moving out, I always say “Cuando mi mamá me corre.” (When my mom kicks me out). "


Day 4: Flowers
For this challenge, I had the perfect location in mind - Sahuaro Ranch Park. This park is near Glendale Community College. I've had sessions there before doing this challenge, but I've never gotten creative with the location. I never actually took the time to scout the location with my camera. 'Till I did this challenge.


Day 5: Sunset
For this theme, I approached differently than you can imagine. How do feel about sun flares in your pictures? I LOVE them. I think it adds a "glow" to the photos. It makes the pictures look magical. And my sister and I went to the perfect location - Anthem Park. It's about a 40 min drive from Downtown Phoenix, but it's worth the drive!
We got to the park a bit too early, so I decided to take photos and making sure there was a sun flare. And I got to say, the pictures are 🎶AMAZING!!!🎶


Day 6: Landscape
As I mention before, I'm a portrait photographer. And this challenge took me out of my photography comfort zone. We went to South Mountain, near Scorpion Gulch to take these pictures.


Day 7: Photography Hack 📸 Using Your Smartphone Flashlight
I saw this hack on YouTube. And this hack can create a light flare in your photos by holding the phone at an angle with the flashlight on.
I added my own idea by holding a pink flower over the phone's flashlight to create the pink hue. What do you think?

Day 8: Shadows
For this challenge, we went to a local park near us, Los Olivos Park. We spend most of the challenge on the kids' playground,
On a personal note, this park was THE park of my childhood. My parents use to take us here when we were little. It was nice taking a trip down memory lane.


Day 9: FREEBIE
This option gives you the opportunity to re-try a previous challenge. And the challenge I re-try was a PHOTOGRAPHY HACK 📸- Using a phone to create a reflection. The first try was on DAY 2. On this try, it took a few tries to get the right angle, but here it is! And I LOVE IT! My sister says it looks like she's jumping above water.

Day 10: Night Photography
When I decided to do this challenge, I got behind. I wanted to take pictures during First Friday, but it didn't work out. Then, the next day, Marlen and I went to Encanto Park to take pictures, but that didn't work out either. The photos looked creepy.
So, on a Sunday - we spend the afternoon at Tempe doing three challenges: SYMMETRY, SILHOUETTE, and NIGHT.
These night portrait photography, we went to Tempe Marketplace. We were there at 10pm taking pictures. We had the place to ourselves. Tempe Marketplace has beautiful outdoor lighting design, which is why I decided to do night photography there.


Day 11: Symmetry
One of the best things about having SYMMETRY in your photos is the LEADING LINES. Take the first two pictures - the bridge is leading your eyes to my sister, who is in the center of the photo. In the last two photos - the triangle in the back helps to center my sister and create direct focus to her.
We went to Tempe Beach Park for this challenge and the next one below.
FUN FACT about doing this challenge is that my sister and I tried a new pose. Can you tell?


Day 12: Silhouette
As I was sharing these photos on my Instagram and Facebook, I kept saying that ALL of my pictures are coming out beautiful and AMAZING! And that's because I was impressed with how my photography style was improving!
Doing the Silhouette challenge was hitting it out of the park - if I do say so myself.
When I showed these photos to my sister as I was taking them, she was like "OMG, I LOVE THEM." And once she saw them edited - she was speechless!


Day 13: Photography Trick 📸 Using a CD
You can use a CD to create a rainbow light effect in your photos. To be honest, this photography trick didn't go as I hoped. I wanted the rainbow effect to be more colorful and powerful. However, I do like how the picture came out. It took a few tries to get the light flare in the right position with the right angle.
Do you see the "rainbow light" on across her face? What do you think?

Day 14: Architecture
For this challenge, Marlen and I spend an entire afternoon in Downtown Phoenix! I used my Sigma 20mm 1.4 Prime Lens. I hardly ever used this wide lens, so it amazing taking out for a change.
When you think of architecture photography, is this what you think?


Day 15: Photography Trick 📸 Using a Photo Frame Glass
Using a Photo Frame Glass to take creative portraits. There are THREE different ways to use this photography trick. 1️⃣First, make sure the glass is crystal clear. Either you or the model holds the glass close to the face. Make sure you get a good angle, where you (as the photographer) don't appear on the glass's reflection. The effect that this creates is a simple reflection/glare. You can see it in the FIRST PHOTO. 2️⃣If you want to create a rain effect, spray water on the glass. For me, this didn't go as I hoped, but I loved the effect it created on the pictures. Look at the SECOND picture. What do you think? 3️⃣The third way is to smear gel on the glass. From the YouTube video that I got this idea from used cleared gel. I didn't have any, so we used my brother's - it was blue. But it got the job done. It created a gaussian blur (or at least something similar). You can see it in the LAST photo.
So, what do you think? This photography trick works best for portraits. My favorite ones were the first, second, and last one. Which was yours?


Day 16: Force Perspective
Marlen and I went to Scottsdale Civic Center Plaza, near Downtown Scottsdale to do this challenge. I wanted to use the LOVE sculpture.


Day 17: Photography Trick 📸 Tilting the lens
This photography trick took me 5 tries to get it as close to a cool and creative picture. When tilting the lens of your camera, it gives you this unique blur on the top or bottom of the frame.
And, as you can see, my picture has a spiral blue going on. I think it’s because I used my 50mm lens to take this picture. In order to get the top or bottom half of the photo blurred, I needed to use a wider lens.
But I do like how the picture came out: it’s different and unique. What do you think?

Day 18: Sunrise
Are you a morning person? Marlen and I woke up at 4:45am to do this challenge. We headed to Papago Park, near the Phoenix Zoo, to take pictures. (FYI - This is my favorite place to go hiking, which I do in the mornings - if I wake up.)


Day 19: Photography Trick 📸Pull Zoom
I admit it! This isn't the most flattering picture. The trick is called a "PULL ZOOM." I saw this trick being done on YouTube, and I thought it was pretty cool. You get a motion blur by just zooming out. But I don't think I did this one right. This was my third time trying the trick. And I don't know what I did wrong. I'm not sure if its the location, the type of zoom lens I used or my camera settings. But I just couldn't keep Marlen in focus. This picture is as close as I ever got.
What do you think?

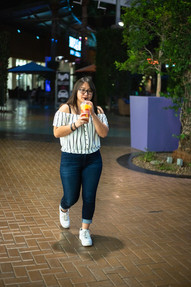
Day 20: Food
Remember, my non-negotiable condition for the 30-day photography challenge is to include people in my photography.
For food photography, Marlen and I went to Zero Degrees - the Tempe Marketplace location. Since the weather was hot, we went there to get a mangonida (mango smoothie).
What's your favorite summer drink?


Day 21: Skyline
I'm more of a city girl. And I LOVE where I live. Phoenix might not be the most green and "WOW" place on earth, but it's my home.
One of the things I'm recently enjoying is going to Downtown Phoenix and walk around. It's beautiful!
The picture below was taken at CityScape.

Day 22: Something Touristy
I live in Arizona. And, while the Grand Canyon might be the best place to visit as a tourist, my favorite place in Sedona. And Sedona is known for the landscape and Slide Rock.
It was my mom's birthday weekend, so my sister and I took her on a road trip to Sedona. Spend the entire day at Grasshopper Point.


Day 23: Movement and Action
Marlen and I went to Tempe Town Lake for this one. I had her walk along the water and jump off. Also, twirling. Taking pictures while you’re doing movement makes the viewer feel like they are there. During the challenge, Marlen was walking (I called the CATWALK) while I was snapping photos. I also had her jumping, my favorite action shot.
Here’s a tip when you're taking pictures of your family and friends: have them do the “catwalk,” jump, twirl, running- a bit of their personality will show.


Day 24: Photography Trick 📸 Tracking
This trick is handy when taking pictures of fasting moving objects, like cars. Now, as you can see, I didn’t use this trick for a fast-moving car, but of my sister on a scooter.
It’s basically following the moving object with your camera at low shutter speed. This creates a blur effect around the moving object. This trick is used when photographers are shooting car races.
Since my sister wasn't going very fast, there wasn't a chance to get a blur effect.

Day 25: Reflection (Water)
I actually wanted to do this one on the street with a puddle, but I couldn’t make it work. So, we went to Tempe Beach Park. I used the bridge and made sure it was reflecting well on the water.

Day 26: Photography Hack 📸Paper Trick
For this challenge, I went looking for our Christmas lights and hung them. Then, I went to two paper sheets.
By folding them in half, I cut one a heart n the middle and the other triangle. I held the paper in front of the lens to create shapes in the background. Do you see them? It was tricky taking the pictures.


Day 27: Photography Hack 📸Having direct light going through objects
I used a table cloth! Marlen and I went outside to our back yard and I held the table cloth up to let a sunray go through the design. It was fun playing around with this one.


Day 28: Photography Trick 📸 Rain Effect
This challenge is similar to the challenge from DAY 15 (Photography Trick - Using a framed glass).
I used a framed glass to create the rain effect. I sprayed water to the glass and hold the glass up while I was taking the picture. I still had the Christmas light up, so I used them as my background. It helped create the purple hue.


Day 29: Photography Tip 📸 Shooting through things
If you ask any photographer or watch videos on YouTube on the easiest and fastest way to improve your photography is by shooting through things. It's the best photography tip there is!
If you go scroll up and look at my pictures again, there's about a 50% chance that I was shooting through things. Or at least have one object on the side of the frame to create depth (aka depth of field).
Look at the pictures below. The first two are a before and after. My sister is sitting on the couch and I just the picture. In the second photo, I moved. We had a flower vase on our dining table, so I stood behind the table and took the picture looking through the flower stems. See the difference?
And for the last two pictures - the same idea. I moved the flower vase in front of the camera and made sure one of the flowers was in the frame.
Give it try next time you're taking a picture of your sister, boyfriend, or kids. You'll see how this simple photography tip can improve your photography.


Day 30: Yourself with 10 things
If you got this far into the blog post, thank you!
If you noticed, I posted this blog in January of 2020. I waited 6 months to share these photos with you because life got in the way and I didn't know how to get through my overloaded emotions.
Unfortunately, I didn't finish the challenge. I need one more and I couldn't think of anything creative for this challenge.
The good news is that I'm planning on doing this challenge again this year, or when I buy a new lens (🤞🏼Canon 85mm or Canon 35mm). And I promise I'll will finish it.
Also, there will be other photography challenges that I'll be doing.
And that's a wrap!
What do you think? Let me know in the comments which challenge was your favorite.
Love,
Janet G.

Personal Note from the Author:
It’s hard to believe that not so long ago, 4 years, my knack for portrait photography was just a bud. I started practicing by photographing my cousins' quinceañera and with my sister.
And today, it has bloomed into a full portfolio! Just like flowers, all it takes is patience, love and care.
As a photographer, I'm here to help you celebrate your traditions and capture all details so you can enjoy and be in the moment. You'll create memories and I'll capture them for you to look back and remember.


Loved reading about your 30-day challenge—daily shooting really does sharpen your eye and build confidence. I did something similar and started recording voice memos during shoots to capture thoughts and ideas. Later, I’d convert MP4 to MP3 from my videos to save those audio notes. It’s a neat way to document progress and reflect on the creative process.